ImgLib2-Imaris-Bridge
ImgLib2-Imaris-Bridge provides arbitrarily large images that are shared between Imaris and Fiji/ImageJ2, without duplicating memory requirements. We focus on big (larger-than-RAM) images, for which both Imaris and ImgLib2 provide sophisticated caching infrastructure. On the ImgLib2 side, we represent Imaris datasets as lazily cached tiled images – image blocks, when they are first accessed, are retrieved from Imaris through the ImarisXT API and cached. Importantly, these images are both readable and writable. Modified blocks are persisted back to Imaris before they are evicted from the cache. (Imaris then in turn persists modified blocks to disk when they are evicted from its cache).
- Quickstart
- Installation
- ImgLib2-Imaris-Bridge API
- Examples
Technically, ImgLib2-Imaris-Bridge exposes the ImarisXT interface as an ImageJ2 Service, providing easy access to running Imaris applications and opened datasets. Note, that this service only covers parts of ImarisXT that are relevant for image data. (Of course, the ImarisService provides full access to the underlying ImarisXT proxies. But only the image-related subset is wrapped in a “imglibby” convenience layer.)
For convenient access to spot detection, surfaces, and other un-related features, have a look at EasyXT from EPFL BIOP. (EasyXT and ImgLib2-Imaris-Bridge can be used concurrently without difficulties.)
Quickstart
If you have both Imaris and Fiji running (otherwise you won’t care…), it’s easy to start playing with ImgLib2-Imaris-Bridge:
Open a dataset in Imaris.
In Fiji, activate the update site “ImgLib2-Imaris-Bridge”. (See this guide for how to activate update sites).
Open the Script Interpreter (via Plugins>Scripting>Script Interpreter or shortcut Shift + [).
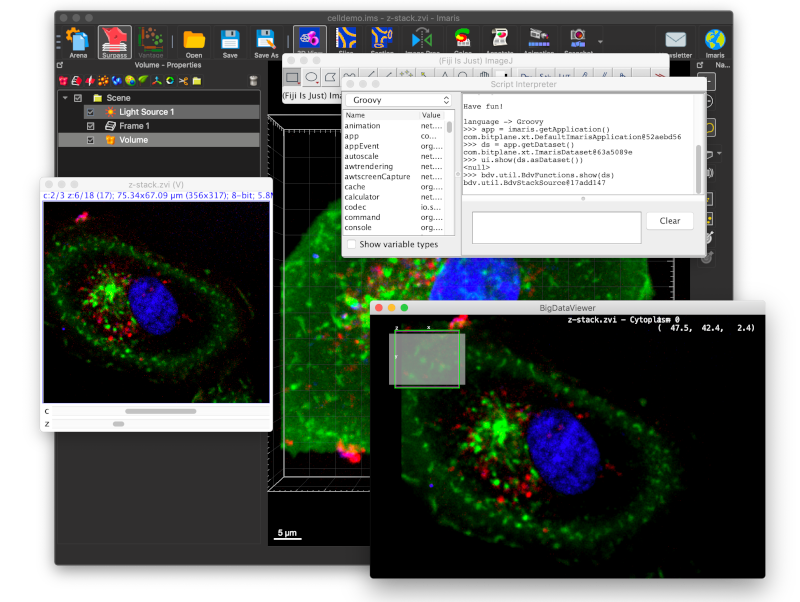
In the interpreter, type app = imaris.getApplication().
This tries to establish a connection to Imaris, and should result in something like
>>> app = imaris.getApplication()
com.bitplane.xt.DefaultImarisApplication@1fbb7c15
If it fails (for example because no Imaris instance is running), you will get an exception.
To get the image currently opened in Imaris, type dataset = app.getDataset().
This will return an ImarisDataset, which wraps the Imaris image.
>>> dataset = app.getDataset()
com.bitplane.xt.ImarisDataset@5b6f26f8
ImarisDataset caches image data for reading/writing from/to the wrapped Imaris image.
It provides several views on this data: as a plain ImgLib2 Img,
as a standard IJ2 Dataset with meta-data,
or as multi-resolution BigDataViewer sources.
For example, to show the IJ2 Dataset in the Fiji UI, type ui.show(dataset.asDataset()).
To show the sources in BigDataViewer, type bdv.util.BdvFunctions.show(dataset).
>>> ui.show(ds.asDataset())
<null>
>>> bdv.util.BdvFunctions.show(ds)
bdv.util.BdvStackSource@17add147
Installation
To use the ImgLib2-Imaris-Bridge ensure that you have a license for the ImarisXT API as part of your Imaris license.
In Fiji, activate the update site “ImgLib2-Imaris-Bridge” https://sites.imagej.net/ImgLib2-Imaris-Bridge.
(See this guide for how to activate update sites).
For developers, the Maven GAV is
<dependency>
    <groupId>com.bitplane</groupId>
    <artifactId>imglib2-imaris-bridge</artifactId>
    <version>9.7.2.2</version>
<dependency>
ImgLib2-Imaris-Bridge API
Connecting to Imaris
To start, you need an instance of
ImarisService.
ImarisService
connects to the ImarisXT API, giving you access to the running Imaris
instance(s)
(ImarisApplication).
Getting ImarisService
There are several ways to get the ImarisService.
If you are writing an ImageJ2 Plugin, you just declare that you need
ImarisService by putting an annotated field
@Parameter
private ImarisService imaris;
which will be populated for you by the framework.
Similarly, if you are running from a script, put an annotated variable
#@ ImarisService imaris
If you are running a stand-alone java application, create a SciJava
Context
and ask for the ImarisService
Context context = new Context();
ImarisService imaris = context.getService(ImarisService.class);
Getting ImarisApplication
From the ImarisService you can get a handle to the running Imaris instance using
ImarisService.getApplication()
// ImarisService imaris created as described above
ImarisApplication app = imaris.getApplication();
For advanced scenarios, where there are multiple running Imaris instances at the
same time, you can get a list of them using
ImarisService.getApplications(),
or get a specific instance by
ImarisService.getApplicationByID(),
ImarisApplication API
ImarisApplication
wraps ImarisXT IApplicationPrx and represents one particular Imaris instance.
ImarisApplication
comprises methods that mirror methods of the ImarisXT IApplicationPrx proxy,
for creating/getting/showing datasets. You can also use
ImarisApplication.getIApplicationPrx()
to access the underlying ImarisXT proxy for accessing functionality not covered
by ImgLib2-Imaris-Bridge (either directly or through
EasyXT).
Getting an existing dataset
Use
ImarisApplication.getNumberOfImages()
to get the number of images currently loaded in the Imaris application.
Then, use
ImarisApplication.getImage(imageIndex)
to get the Imaris image at a particular index (and wrap it as an ImarisDataset).
Or use
ImarisApplication.getDataset()
as a shortcut to get the first image (and wrap it as an ImarisDataset).
Creating a new dataset
Use
ImarisApplication.createDataset(...)
to create a new Imaris dataset (and wrap it as an
ImarisDataset).
There are some intricacies related to mapping between Imaris and ImgLib2 data
types and dimensionality, which are discussed below.
ImarisDataset are by
default writable: You can use them for computation results that are communicated
back to Imaris. Newly create datasets are not immediately visible in Imaris. You
have to use the following methods to make them visible.
Showing a dataset in Imaris
To make a dataset visible in Imaris, you have to call
ImarisApplication.setImage(imageIndex, dataset)
This will set the visible image at index imageIndex in the Surpass view to dataset (there can be multiple images visible at the same time).
Or use
ImarisApplication.setDataset(dataset)
as a shortcut to set the image at index 0.
ImarisDataset API
ImarisDataset wraps
IDataSetPrx and represents an Imaris dataset. This is where the meat of
ImgLib2-Imaris-Bridge is. The Imaris dataset is wrapped into an ImgLib2 CachedCellImg
that is both readable and writable. Data is lazy-loaded from Imaris – image
blocks, when they are first accessed, are retrieved through the ImarisXT API
and cached. Modified image blocks are persisted back to Imaris before they are
evicted from the cache. (Imaris then in turn persists modified blocks to disk
when they are evicted from its cache.)
ImarisDataset
provides various views on the image data, each of which is useful in different
contexts in Fiji. All the different views are backed by the same common cache.
There is no duplication of image data, and modifications to any one of the views
are visible in all other views.
First, there are views on the full-resolution image (level 0 of the Imaris resolution pyramid):
ImarisDataset.asImg()exposes the dataset as an ImgLib2Img. This is the representation that is most used for image processing, i.e., feeding into various ImgLib2 algorithms (which will simply work, as on any otherImg).ImarisDataset.asImgPlus()exposes the dataset as an ImageJ2 ImgPlus, that is, andImgwith additional metadata about axes, calibration, etc.ImarisDataset.asDataset()exposes the dataset as an ImageJ2Dataset. This is the representation that is most useful for putting the dataset into the standard ImageJ2 UI. E.g., callingij.ui().show(dataset.asDataset()displays the dataset in a standard Fiji ImagePlus window.
Besides that, ImarisDataset also implements BigDataViewers
ChannelSources
interface, which can be used in BigDataViewer and plugins built on top of it.
The nice thing about this representation is that it
- exposes the full Imaris resolution pyramid as a BDV resolution pyramid, and
- provides non-blocking versions of these pyramid levels (i.e. BigDataViewer remains responsive while missing data loads in the background).
Both are essential for working interactively with large images.
Showing this representation of the
ImarisDatasetin BigDataViewer is as easy asBdvFunctions.show(dataset).
Mapping Imaris data types to ImgLib2
The generic T parameter of
ImarisDataset<T> is
the ImgLib2 pixel type of the dataset.
Imaris supports 8-bit, 16-bit, and 32-bit floating point images.
The corresponding ImgLib2 types are UnsignedByteType, UnsignedShortType, and FloatType.
(When creating new ImarisDataset, one of these types must be used).
Mapping Imaris dimensions to ImgLib2
This is where it gets a bit complicated…
Imaris images are always 5D with XYZ, Channel, and Time axes (in this order). So for example, in Imaris, a 2D image (without channel or time) is represented as 5D with size=1 along the Z, C, T axes. Conversely, in ImgLib2, there is a distinction between a 2D image and a 5D image with size=1 along the 3rd, 4th, and 5th dimension. Therefore, there are several ways to represent an (effectively) 2D Imaris dataset in ImgLib2 (as 2D, 3D, 4D, or 5D). Which way is desirable depends on the usage scenario.
ImarisDatset supports all possible mappings of dimensions. You specify which one
you need when creating a dataset, or getting a dataset from Imaris.
A new dataset is created by
ImarisApplication.createDataset(type, sx, sy, sz, sc, st).
The type argument is either UnsignedByteType, UnsignedShortType, or FloatType.
The sx, sy, sz, sc, st arguments specify the size of the new dataset along the 5 Imaris dimensions XYZCT.
To indicate that a particular dimension should be left out of the ImgLib2 representation, you set the argument to 0.
So for example createDataset(new UnsignedByteType(), 1000, 1000, 1, 1, 1) and
createDataset(new UnsignedByteType(), 1000, 1000, 1, 0, 0 will create identical datasets on the Imaris side.
However, the first one will have a 5D representation in ImgLib2 (e.g. dataset.asImg()), while the second one
will have a 3D representation.
When wrapping an existing dataset, for example through
ImarisApplication.getDataset(),
by default axes with size=1 will be stripped from the ImgLib2 representation. So
the dataset created through either of the above calls would have a 2D
representation. You can override this by specifying that certain axes should
always be included, even if they have size=1. You do this by providing
additional options (more on that later). For example,
getDataset(ImarisDatasetOptions.options().includeAxes(X, Y, Z, C, T) ensures
that you always get a 5D ImgLib2 representation.
Mapping Imaris calibration to ImgLib2
The caveat here is that ImgLib2 pixel coordinates refer to the “center” of a pixel, whereas Imaris pixel coordinates refer to the “corner” of a pixel.
The main thing to keep in mind is that when manipulating the calibration of an
ImarisDataset ImgLib2 conventions are used. That is, when using
ImarisDataset.getCalibration()
or
ImarisDataset.setCalibration(...)
min coordinates refer to voxel centers. ImarisDataset translates this to/from
Imaris convention when talking to ImarisXT.
Specifying additional ImarisDataset options
Methods for
getting
or
creating
Imaris datasets take an optional
ImarisDatasetOptions
argument.
ImarisDatasetOptions
is a builder-like class that allows to configure additional details about how
the dataset should be wrapped.
In particular, you can specify that certain axes must be included in the ImgLib2 representation (as discussed above).
Besides that, you can also configure
- which type of cache to use,
- which cell size (blocks that are read and sent from/to Imaris as a whole) to use,
- whether a dataset is used read-only (this potentially saves a bit of performance because the logic for tracking modified blocks is not necssary),
- how many worker threads write blocks back to Imaris,
but usually it should be fine to just go with the defaults.
For details, please refer to the ImarisDatasetOptions javadoc.
As an example, this is how you would get the current dataset with
- axes XYZ and T present in the ImgLib2 representation,
- using a size-bounded LRU cell cache with 128 entries,
- using a queue of 16 blocks to send back to Imaris and 8 threads serving that queue:
ImarisDataset<?> dataset = app.getDataset(ImarisDatasetOptions.options()
      .includeAxes(X, Y, Z, T)
      .cacheType(BOUNDED)
      .maxCacheSize(128)
      .maxIoQueueSize(16)
      .numIoThreads(8));
Modifying datasets and sending changes to Imaris
ImarisDataset is writable (unless is was constructed with the readOnly() option).
The pixels of the full-resolution image, can be accessed and modified through the
ImarisDataset.asImg() view, for example.
The coarser levels of the resolution pyramid cannot be written directly.
Instead, the resolution pyramid is computed internally by Imaris from the full-resolution image.
When pixels are modified, the changes are not immediately visible in Imaris.
Changes are batched into blocks corresponding to cells in the CachedCellImg representation.
When a pixel in a cell is written, the cell is not transferred immediately
because more changes in the same cell are to be expected, and it would be very
inefficient to transfer the same block many times over, for each one-pixel
modification. Instead, the block is merely marked modified and transferred only
later, when it is evicted from the cache.
This means, that it can take a long time for changes to “naturally” show up in Imaris.
In fact, some changes might never show up if, for example, Fiji or Imaris are quit before
the cache eviction happens.
Therefore, after you are done writing a ImarisDataset, you should explicitly persist all changes to Imaris
using ImarisDataset.persist().
The
persist()
method blocks until all current changes have been made visible to Imaris. There
should be no concurrent modifications made to the ImarisDataset, while
persist() is running.
Examples
Minimal IJ2 Example
ExampleIJ2
shows a minimal stand-alone Java program, using ImarisService to show the current Imaris dataset in a new ImageJ instance.
import com.bitplane.xt.*;
import net.imagej.ImageJ;

public class ExampleIJ2
{
    public static void main( final String[] args )
    {
        /*
         * Start ImageJ2 and show the UI.
         */
        ImageJ ij = new ImageJ();
        ij.ui().showUI();

        /*
         * Obtain the ImarisService instance.
         */
        ImarisService imaris = ij.get( ImarisService.class );

        /*
         * Get the currently open dataset from the first (and typically only)
         * Imaris application.
         */
        ImarisDataset< ? > dataset = imaris.getApplication().getDataset();

        /*
         * Show the IJ2 Dataset view in the ImageJ UI.
         */
        ij.ui().show( dataset.asDataset() );
    }
}
In particular, this illustrates how to get the ImarisService from an net.imagej.ImageJ instance.
Minimal BigDataViewer Example
ExampleBdv
shows a minimal stand-alone Java program, using ImarisService to show the current Imaris dataset in BigDataViewer.
import bdv.util.*;
import com.bitplane.xt.*;
import org.scijava.Context;

public class ExampleBdv
{
    public static void main( String[] args )
    {
        /*
         * Create a SciJava context, and obtain the ImarisService instance.
         */
        Context context = new Context();
        ImarisService imaris = context.getService( ImarisService.class );

        /*
         * Get the currently open dataset from the first (and typically only)
         * Imaris application.
         */
        ImarisDataset< ? > dataset = imaris.getApplication().getDataset();

        /*
         * Show the multiresolution version in BigDataViewer.
         */
        BdvFunctions.show( dataset );
    }
}
In particular, this illustrates how to get the ImarisService from a new SciJava Context.
Creating a new Imaris dataset
ExampleCreateDataset
shows how to create a new ImarisDataset, fill it with values, and show it in Imaris.
import com.bitplane.xt.*;
import net.imglib2.Cursor;
import net.imglib2.type.numeric.integer.UnsignedByteType;
import org.scijava.Context;

public class ExampleCreateDataset
{
    public static void main( String[] args )
    {
        /*
         * Create a SciJava context, obtain the ImarisService instance, and get
         * the first (typically only) Imaris application.
         */
        Context context = new Context();
        ImarisService imaris = context.getService( ImarisService.class );
        ImarisApplication app = imaris.getApplication();

        /*
         * Create a new Imaris dataset with pixel type UnsignedByteType, The
         * ImgLib2 view of the dataset is 3D (XYZ) with size 128x128x128. (On
         * the Imaris side, its 128x128x128x1x1).
         */
        ImarisDataset< UnsignedByteType > dataset = app.createDataset(
                new UnsignedByteType(),
                128, 128, 128, 0, 0 );

        /*
         * Use a ImgLib2 Cursor to fill the dataset with some values.
         */
        Cursor< UnsignedByteType > c = dataset.asImg().localizingCursor();
        int[] pos = new int[ 3 ];
        while ( c.hasNext() )
        {
            c.fwd();
            c.localize( pos );
            int value = pos[ 0 ] ^ pos[ 1 ] ^ pos[ 2 ];
            c.get().set( value );
        }

        /*
         * Make sure that all changes are persisted to Imaris.
         */
        dataset.persist();

        /*
         * Show the dataset in Imaris.
         */
        app.setDataset( dataset );
    }
}
ImageJ2 Command using ImarisService and ImageJ Ops.
ExampleOp shows how to create Fiji plugins that operate on Imaris images. In particular, the code illustrates that
ImarisDatasetcan be modified in place, and- plugins can operate headlessly, just reading and writing results to Imaris.
The ExampleOp
command
uses the ImageJ OpService to run a Gauss smoothing in X direction on the current Imaris dataset
(running in-place, and modifying the dataset).
It shows up in the Fiji menu Plugins > Imaris > Smooth X.
import com.bitplane.xt.*;
import net.imagej.ImageJ;
import net.imagej.ops.OpService;
import net.imglib2.img.Img;
import org.scijava.command.Command;
import org.scijava.plugin.*;

@Plugin( type = Command.class, menuPath = "Plugins>Imaris>Smooth X" )
public class ExampleOp implements Command
{
    @Parameter
    private ImarisService imaris;

    @Parameter
    private OpService op;

    @Override
    public void run()
    {
    	ImarisDataset< ? > dataset = imaris.getApplication().getDataset();
        Img img = dataset.asImg();
        double[] sigmas = new double[ img.numDimensions() ];
        sigmas[ 0 ] = 10.0;
        op.filter().gauss( img, img, sigmas );
        dataset.persist();
    }
}
Groovy script in Fiji/ImageJ2
Finally, here is the same “smooth in X” operation as a Groovy script:
import com.bitplane.xt.*;

#@ ImarisService imaris
#@ OpService op

dataset = imaris.getApplication().getDataset()

img = dataset.asImg()
double[] sigmas = new double[img.numDimensions()]
sigmas[0] = 10.0
op.filter().gauss(img, img, sigmas)

dataset.persist()
You can save this to a file called smooth.groovy, then run it from the Fiji script editor, or from the command line
$ FIJI --headless --run gauss.groovy
(where FIJI is the path to the Fiji executable.)